Hế lô các bạn đã lâu không gặp.
mình là tôi đi tán gái dạo C:
Dạo gần đây kênh youtube toidicodedao có ra 1 video hướng dẫn Code app chat chỉ với 15p sử dụng websocket các bạn có thể tham khảo ở đường link dưới để biết real-time chat app hoạt động như thế nào nhé!
https://www.youtube.com/watch?v=Ab7sqFML-4E&t=525s&ab_channel=Ph%E1%BA%A1mHuyHo%C3%A0ng
Chợt mình lại nghĩ ra 1 ý tưởng đi xa hơn nữa là tại sao không thử sử dụng serverless để chạy app?
Thế nên hôm nay mình sẽ demo 1 app chat nhỏ nhỏ cây nhà lá vườn làm chốn đò đưa giải trí cho các bợn ❤
link cho bạn nào chỉ muốn nghịch:
https://d139yel1pz2zrl.cloudfront.net/
Tập 3: Làm hang tu hú
Công cụ
- Python – ngôn ngữ lập trình tùy chọn
- ApiGateway, Lambda, DynamoDB – Combo serverless service được dùng phổ biến trên aws
- AWS SAM – tool dành cho việc deploy 3 service trên đơn giản hơn (optional)
- 1 tí html css js làm frontend
Dừng lại đã! Serverless là cái gì vậy?
Serverless nói chính xác hơn là 1 mô hình – pay-for-value billing model – nơi mà các resource được aws quản lý tập trung bởi aws thay vì bản thân phải quản lý những resource này.
Những service theo mô hình serverless có khả năng scale mạnh hơn rất nhiều so với sử dụng server vật lý hay ec2.
Điểm qua nếu bạn không tin thì cái app củ chuối mình làm trong bài viết này có thể đối ứng đến hàng triệu user mà không gặp bất cứ vấn đề về performance (nhưng gặp vấn đề về tiền)
Bù lại khi không có user thì mình hoàn toàn không phải trả 1 đồng nào cả ❤
OK let’s go
1.Backend
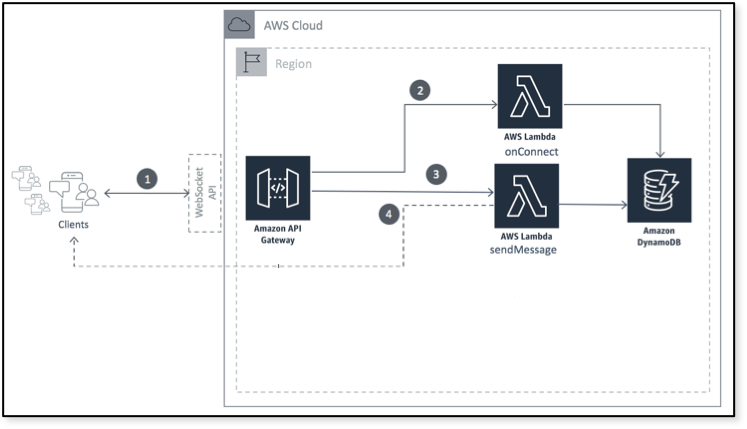
dựng websocket backend qua ApiGateway
Đa số mọi người thường chỉ dựng REST api qua ApiGateway mà không biết rằng websocket cũng có thể dựng được.

khi tạo xong thì sẽ có 3 Route $connect, $disconnect, $default mặc định có thể hiểu như sau:
$connect – khi user connect đến websocket
$disconnect – khi user disconnect khỏi websocket
$default – không quan tâm
Đa số các thư viện xử lý websocket ở frontend sẽ chuẩn bị 1 request có body như sau:
"body": {"action": "gì đó", <thêm bao nhiêu key value tùy thích> }
"body": {"action": "sendmessage", "message":"hihi","from":"- T -", "time":"2021-1-1"}
Tương ứng với mỗi action thì tại apigateway phải có 1 route để pass qua cho lambda

Ở đây mình sẽ chỉ handler 2 route là $connect và sendmessage
$connect – khi user kết nối đến sẽ lưu lại connectionId vào dynamoDB
sendmessage – khi user gửi tin nhắn

Apigateway đứng giữa sẽ lo việc maintain websocket connection với client (như kiểu BrSE ấy)
Ở hàm lambda onConnect ta sẽ cần lưu lại thông connectionId để dùng lại khi muốn gửi message từ server về client
import boto3, os, json

def handler(event, context):
    ddb = boto3.client("dynamodb")
    # new connection
    try:
        ddb.put_item(TableName=os.environ['connections_table'],
                    Item={'connectionId': {'S': event['requestContext']['connectionId']} })
    except Exception as e:
        print(e)
        return {'statusCode': 500, 'body': 'Failed to connect'}
    return {'statusCode':200, 'body': 'OK'}
ở hàm sendMessage:
- lưu data vào DB
- gửi lại data cho các connection khác
import boto3, os, json

def handler(event, context):
    print(event)
    ddb = boto3.client('dynamodb')
    # insert message to DB
    body = json.loads(event['body'])
    try:
        ddb.put_item(
                    TableName=os.environ['messages_table'],
                    Item={
                        'time': {'S': body['time']},
                        'from': {'S': body['from']},
                        'message': {'S': body['message']}
                    })
    except Exception as e:
        print(e)
        return {'statusCode': 500, 'body': 'Failed to connect'}

    apiGwSocket = boto3.client('apigatewaymanagementapi', endpoint_url= 'https://' + event['requestContext']['domainName']+ '/' + event['requestContext']['stage'])
    # get connection info
    try:
        connectionData = ddb.scan(TableName=os.environ['connections_table'], ProjectionExpression='connectionId')
    except Exception as e:
        print(e)
        return {'statusCode': 500}
    # send data to client
    for connection in connectionData['Items']:
        if event['requestContext']['connectionId'] == connection['connectionId']['S']:
            continue
        try:
            apiGwSocket.post_to_connection(ConnectionId=connection['connectionId']['S'], Data=json.dumps(body))
        except apiGwSocket.exceptions.GoneException as e:
            print(e)
            print('stale connection')
            ddb.delete_item(TableName = os.environ['connections_table'], Key={'connectionId': {'S': connection['connectionId']['S']}})
    return {'statusCode': 200, 'body': 'Data sent'}
Test nhẹ 1 cái

Âu kê vậy là xong phần backend.
Lưu ý là đẻ làm thật thì bạn cần phải setting IAM role các thứ nữa mới xong nhé.
Bạn có thể clone SAM template repo link ở cuối bài viết về deploy cái xong luôn 😀
2. Frontend
Không lằng nhằng mình chôm ngay trang ở link ở đây
https://codepen.io/smfcoder/pen/KKpRGQd
Trang này chỉ là 1 static site không hơn không kém
nên để tích hợp websocket thì cần thêm sửa javascript 1 chút
(lược)
function setupWebsocket(){
    var ws = new WebSocket(websocket_endpoint);
    ws.onopen = (e) => {
        console.log('Connection opened!');
    }
    ws.onclose = function() {
        ws = null;
        console.log('Connection closed!');
        setTimeout(setupWebsocket, 1000);
    }
    ws.onmessage = function (e) {
        const data = JSON.parse(e.data);
        console.log(data)
        const message_entity = new Message(data.message, data.from, new Date(data.time))
        App.messages.push(message_entity);
        App.refreshChat();
    }
}
setupWebsocket()
(lược)
Ngoài ra bạn có thể thêm 1 HTTP api đơn giản tại backend dùng để fetch messages đã lưu tại DB
Ném ngay đống static lên S3 và bật static website hosting ez

Và thế là xong…
https://d139yel1pz2zrl.cloudfront.net/
Kết bài
Không biết các bạn có hứng thú với những bài viết hơi lằng nhằng hay những bài viết đơn giản ăn liền hơn?
Bài viết cho kịp kpi nên hơi gấp gáp xin hứa là bài sau sẽ còn hấp dẫn hơn nữa! ❤
link gitlab repo
Tập trước:
tập 2: Rekognition kiểm tra độ xinh gái của đối tượng
tập 1: Python & Selenium Gửi 100000000000000 ❤ trong 1 đêm


Vui lòng đăng nhập để bình luận.